Strike! consists of a pretty simple rules-light core rule set, with more detailed subsystems for Team Conflicts, Chases, and Tactical Combat that allow adding some detail and tactical choice to different kinds of conflict.
Team Conflict is intended to allow going into more detail than just a few ordinary rolls for pretty much any situation, but especially ones in which each PC is contributing something to a group effort. Chases are pretty straightforwardly for when some people are trying to chase down some other people who are trying to escape them. Tactical Combat is for fights.
The book estimates that Team Conflicts take about ten minutes, Chases are usually over within five minutes, and Tactical Combats take between twenty and thirty minutes. Although these will all take longer when first learning the subsystems.
The GM is responsible for: TKTK (see p. 4)
The players are responsible for:
The book wants you to prioritize these three things when playing your character, although it’s up to how to rank them against each other:
Strike! uses an exception-based design: there are general rules, but a specific character or ability or situation may define exceptions to those general rules, and more specific rules trump more general ones.
As in many games, when things get uncertain or run into opposition it’s time for a roll. There are two types, standard Skill Rolls and Opposed Rolls (which will be explained below). Basically you use Opposed Rolls is another character is opposing you and Skill Rolls otherwise.
Here’s how a Skill Roll works:
| Skilled | Unskilled | |
|---|---|---|
| 6 | Success with a Bonus | Success and learn Skill or with a Bonus |
| 5 | Success | Success |
| 4 | Success | Success with a Cost |
| 3 | Success with a Cost | Twist |
| 2 | Twist | Twist |
| 1 | Twist with a Cost | Twist with a Cost |
If you have some strong edge working in your favor you get to roll with Advantage (roll two dice and take the higher). If you have some strong drawback working against you, you roll with Disadvantage (roll two dice and take the lower). Disadvantages don’t stack and Advantages don’t stack. If you would have Advantage and Disadvantage, you roll normally, even if you have like five sources of Advantage and only one of Disadvantage.
When you succeed, you get your internet. The GM and other players can add details, but they can’t add anything that takes away from your victory.
Success with a Bonus means you succeed as normal, but you also get some kind of additional benefit. A Bonus can be an even better success than you aimed for, or something tangential or unrelated that you get in the course of your succeed. The player who rolled chooses their Bonus, although the GM and other players may object or insist on modifications if it doesn’t work.
Quick guidelines that should help keep your Bonus from bothering the other players: * It has to be consistent with the game’s tone. * It shouldn’t invalidate important aspects of the game or of anybody’s plans. * It shouldn’t dwarf your initial success. * Giving yourself Advantage on an appropriate future roll is basically always a fine default.
When you get a 6 on an Unskilled Roll without Advantage/Disadvantage, you can choose between a bonus or permanently learning the Skill you were rolling. With Advantage or Disadvantage you have to roll either double 6s or a 6 and a 5 (this is half as likely) instead. With Disadvantage, a 6 and a 5 still counts as a 5 for purposes other than whether you get to learn the Skill.
A Twist means something threw off your plans. You might still get your intent, but something went wrong or contrary to expectations. It might not be your fault, might not even relate directly to what you were doing, might not even be bad. It’s usually bad, tho.
When you get a Twist, the GM narrates how you got to the Twist and what happens. That may involve some amount of describing what your character did. If the GM oversteps, it’s worth talking it out, but don’t forget that you don’t know everything there is to know about your character either. Twists are one of the key ways that the characters are really revealed to us as players.
A Cost is something that gives you a Disadvantage going forward. Twists are usually mostly narrative, but Costs are specific mechanical penalties in particular situations. They come in three varieties: Conditions, Flaws, and Favors. The GM usually assigns Costs when you roll one. Costs do also have some narrative effect (e.g. people will react to your character being visibly ill or wounded, and somebody you owe a favor might decide to drop in to collect).
Conditions are something inherent to your personal state that prevents you from performing at your best. There are a number of specific ones that represent different problems and impact different situations.
Flaws are known problems with an item or with information. The GM gives you Disadvantage when the Flaw is relevant to what you’re doing. You can also choose to use the Flaw to automatically get a Twist in exchange for an Action Point.
Owing somebody a Favor means that they’ll help you, but now they expect you’ll help them out sometime. You and your friends have Disadvantage to ask them or their associates for furhter help until the Favor is repaid. If you take too long to repay a favor, it might develop into a Bad Reputation, which gives Disadvantage the same way but is harder to get rid of and can eventually spread beyond just the one character of group you owed the Favor to.
Usually which Cost you get depends on what you were trying to do. Trying to convince somebody to help you usually will leave you owing a Favor if you roll a Cost, while getting or creating an item or finding out some information means any Cost will likely be a Flaw. Other activities mostly get an appropriate Condition.
Sometimes the GM can give you a Cost even without you rolling. For example, if you try to take a bullet for somebody, you’re gonna get the Injured condition even if you roll a Success. The GM should only do this when it’s unsurprising.
Conditions are temporary ailments that prevent you from doing your best. Ther are both Minor Conditions and Major Conditions. Usually you won’t get a Major Condition until after you already had a similar Minor Condition, but the GM can go straight to Major if it makes sense. The list of Conditions isn’t exhaustive, as the GM or group can make up new ones.
Major Conditions are really rough. If you end up with more than one, you probably want to focus on getting better before you go on adventuring.
If your friends are recovering but you don’t have any Conditions, now’s a good time to do something useful on your own like exploring, making something, doing some research, or talking to the locals.
Skills are free-form in Strike! and get made up on the spot. They’ve gotta be something specific though.
Don’t try to stretch your skills. Just roll Unskilled if you don’t have a Skill that quite fits, it’s fine! If you’re lucky you might even get to learn the new Skill!
You can use Skills in a few ways:
Some Skills, like Business Contacts, Church Hierarchy, or Genie Summoning, are considered Connections Skills, which you roll when you’re trying to find a particular person or somebody with a particular skillset. Usually you use these to find people your character already knows. You can, of course, roll these Unskilled, too.
The fun once rule is: you cannot roll for the same task and intent more than once.
This means, if you’re trying to climb a rope to the first floor, the GM can’t make you roll to climb to the second floor, then again to climb to the third, then again to the fourth. One roll decides whether you get your intent.
On the other hand, you can’t roll to climb the rope, fail, and then roll to try again.
A dramatic change in the situation is likely to change what your intent might be, so you might get to or have to roll again after that. Or, if you’re doing a similar thing (sneaking around) but for a different intent (e.g. trying to get into the castle to raise the portcullis for your friends versus scouting ahead for guards), then Fun once doesn’t apply.
Opposed rolls are for when you and an opponent are acting in opposition to each other; you’re in an argument, a race, setting your criminal organizations against each other to try to establish control over the docks. Here’s how it goes:
The loser of a close roll chooses one of those options, and they can make suggestions for how they see it working, but the GM is the one who gets to fill in the details beyond the text of the option. Not all of the options will make sense in context, and it’s up to the loser to chose one that does and to the GM to explain the result in a way that makes sense in the story and satisfies both the winner’s Success and the loser’s choice.
On a tie, you may earn an Action Point by breaking the tie in your opponent’s favor using one of your Complication or Flaws. If nobody does that, then neither side gets their intent: the GM says what happens, assigning Costs or Twists to each side as seems fitting.
An Unskilled character gets to learn the Skill they’re using like normal: on a 6 if they don’t have Advantage or Disadvantage, or on two 6s or 6 and 5 with Advantage or Disadvantage.
If both sides are rolling the same sort of Skill, but one side’S Skill is more specific to the task, treat the roll as if the character with the more general skill is Unskilled, so they roll with Disadvantage but can potentially learn the skill.
A Linked Roll is a roll you make to prepare for a later or simultaneous action: buying or creating tools for you or an ally to use later, spreading rumors about an opponent to have an advantage at a trial, or the like. Basically, something that, depending on how well you succeed or fail, could help or hinder the subsequent roll.
A Linked Roll is a normal roll with its own usual outcomes. But also, if you Succeed, you (or whomever you’re setting up) gets Advantage on the future roll. While if you roll a Cost, the GM may choose to give you Disadvantage on the future roll instead of a normal Cost. If they give you Disadvantage, they can either describe why immediately or wait for the affected roll.
Helping is for when you’re lending aid in a way that isn’t really an independent action with its own consequences. For example, helping somebody push a boulder or lift a portcullis.
When you help, you roll a die if Skill or with Disadvantage if Unskilled. If your roll is higher than that of the person you’re helping, add 1 to their roll.
If multiple people are helping, each rolls and their help takes effect from lowest to highest. For example: Will rolls a 2, Eric is helping and rolls a 5, and Sofi is helping and rolls a 3; Sofi had the lower helping roll, so it applies first and it still higher than Will’s, so it adds 1; Eric’s roll is next and 5 is higher than 2+1=3, so adds 1 for an end result of 4.
If the roll results in a Cost despite the help, then any helpers get a Cost too. If the character who made the roll owes a Favor, the helpers might also be obligated by the Favor. If the helpers tried to use their knowledge to help, their knowledge might have a Flaw. Maybe you’re just Angry at your friend for messing up despite your help.
You have Action Points (AP) that you can spend to perform above the usual. They have both non-combat and combat uses. Out of combat, you can use them in two ways:
In Tactical Combat, you’ll be able to use Action Points to Rally and keep fighting. Each Role also has an Action Trigger that allows spending Action Points for some Role-appropriate benefit.
You get an Action Point at the start of each session if you don’t have any and can carry over up to three AP from session to session. Each session each player also has one Awesome Point: you can’t use the Awesome Point yourself, but you can award it to another player for doing something awesome (don’t just give it to somebody because they seem like they need it; they have to do something you think is awesome). If you haven’t given away your Awesome Point at the end of the session, you can award it then for something that happened earlier.
You also can get Action Points from Complications.
If you’re making a Skill Roll, and you have another Skill besides the one you’re rolling that you think ought to be helpful, you can spend an Action Point to get Advantage on your roll.
Each character starts with two Tricks and will gain more over time. A Trick is some narrow application of your skill that you can spend an Action Point to automatically Succeed at with a Bonus.
Complications are ways that your character tends to get in trouble. Like Tricks, you start with two and will get more over time. You can let them cause your character trouble and gain an Action Point in these ways:
The GM can never give you Disadvantage for your Complications. Your Complications only come up when you choose to let them. They are true in the fiction, though, and people and the world may react to them.
You may also use a Cost such as a Condition or Flaw as if it were a Complication.
Most items have a primarily narrative effect. Their mechanical effect is just in letting you do things that wouldn’t make sense without them.
Sometimes items do have more explicitly mechanical effects: an item can have a Flaw, which can be used like a Complication and the GM can also give you Disadvantage for it. Others might give you some combat power, or a new trick, etc. The GM will figure those out.
Some Skills require Tools of some kind to use properly. If you don’t have them, you can’t attempt the task; if your tools are makeshift or shoddy, you have Disadvantage. You start out with any needed Tools for your starting Skills. Learning Skills later doesn’t give you any necessary tools; you’ll have to acquire them in play.
Wealth is a very special sort of Skill that has multiple levels and multiple levels of difficulty. Wealth represents how much money you have, how easily available it is to you, and how good you are at using it to get what you want.
Wealth is ranked from 0 to 3, which levels also have descriptive names: Penniless [0], Poor [1], Rich [2], Super-rich [3]. Purchases are ranked from 0 to 4. Each price level is about 20 times more expensive than the last.
As a quick summary in contemporary US terms:
Here’s the rules for how to buy things:
| Roll | Cheap | Same Level | Expensive |
|---|---|---|---|
| 6 | Success + Bonus | Success + Bonus | Success |
| 5 | Success + Bonus | Success | Success + Cost |
| 4 | Success | Success + Cost | Success + 2 Costs |
| 3 | Success | Success + 2 Costs | Twist |
| 2 | Success + Cost | Twist | Twist + Flaw |
| 1 | Success + 2 Costs | Twist + Flaw | Twist + Flaw |
Five characters of Wealth X (up to two of which can be substituted for by a cash parcel of the same level) can roll as one character of Wealth X + 1. All of them suffer any Costs or Twists.
Helping somebody of a different Wealth tier uses a modified form of the Helping rules. When helping somebody one Wealth tier higher, you roll your helping die with Disadvantage; when helping somebody one tier lower, you roll your helping die with Advantage. You can’t help somebody two tiers above you and it probably doesn’t make sense to help somebody two tiers below you instead of just buying the thing yourself. If the player you are helping chooses to break the bank (as described below), you get the condition Short.
There are two special Conditions you can get related to Wealth rolls: Short and Broke.
When you’re Short, you act as though you were one Wealth level lower. When you get two Costs on a Wealth roll, one is always a Flaw and the other is either that you are Short or owe somebody a Favor.
Sometimes when you roll a Twist the GM will offer you a choice of doing without them the item or “break the bank” to pay for it. When you break the bank, you’re Broke. It’s like being Short, and you act as though you’re one Wealth level lower, but it’s a lot harder to recover from.
If you get the Short condition three times without managing to recover from them, you become Broke instead (like Winded and Exhausted). If you’re both Short and Broke, they stack and you act as though you’re two levels of Wealth lower than normal. Multiple instances of Broke are also cumulative.
You recover from being Short by working your job and being frugal for a week, or something analogous, or by spending a cash parcel of the same tier you’re recovering to.
To recover from being Broke, work your job and live frugally for a year, or the like, or spend a cash parcel one level above the one you’re recovering to.
Cash parcels represent cash, or other easily spent loot. They have ranks like purchases do. They function like Tricks to make purchases of the same rank, except that instead of spending an Action Point, you spend the Trick, and you don’t get a Bonus.
You can sell your stuff for cash parcels, or find them in the course of your adventues.
You can also increase your Wealth tier permanently by investing a cash parcel one level above the tier you’re trying to reach. This takes time, though
TKTK p. 28
The first time you level up, you gain a Fallback, which represents the thing you always fall back on when you’re in trouble. Once per session, you can use it to turn a Twist into a Success (a Twist with a Cost into a Success with a Cost). After the GM describes the Twist, you get to narrate how you used your Fallback to turn the situation around and achieve the original intent. Your Fallback should be something broad, like bravery or meticulous planning. You’ll only get one, but they’re very powerful!
There are two ways you earn new Tricks:
There are also two ways you earn new Complications:
You can swap out a Complication for another whenever it’s narratively appropriate. It’s up to you to decide when it’s narratively appropriate, although others can voice their opinions.
You can also change your Tricks if it’s narratively appropriate, but for that you need the unanimous approval of the group, since constantly changing out your Tricks would be too easy to exploit.
When one of your Tricks or Complications stops making sense (for example, your Trick was about buying things but in the course of the game you lose all your money), you get to replace it with a new one immediately.
Team Conflict is the most generic of the detailed subsystems, being intended to support just about any sort of conflict between groups of characters (or a group of characters and their environment, or really even just individual characters is fine too): a journey, a battle, a fight that doesn’t warrant tactical combat, a debate, a heist, whatever.
Here’s the gist: * Two sides face off in a series of rounds. * Each round each side has an Advance and a Defend score based on what they did that round and how they rolled. * Each side’s Advance score is compared to the opponent’s Defend score. If the same side wins both comparisons, they win the conflict. Otherwise the conflict continues, although there are consequences of each possible outcome.
There’s more complexity involved in practice, but that’s the core concept.
At the start of the conflict, each side chooses an intent (what they’re trying to accomplish) just like Skill or Opposed Rolls. You don’t choose a task, though: you’ll probably perform a variety of tasks over the course of the Team Conflict.
Then each round has two phases: both sides selecting their actions, and then resolving the actions.
Actions are what determine the players’ Advance and Defense scores. Their opponents are more fixed. Each round, each player chooses an action from the list below, describes what they’re doing, and what Skill they’re using. If you don’t have a relevant Skill you can only use the four basic actions; if you do, you can use any of the actions. Only two people on a team can choose the same non-basic action in a round. Each action gives a bonus to Advance (A) and/or Defense (D), and might have an additional effect.
Your description of what you’re doing needs to match the effect of the action you’re using and the Skill you’re using, but they don’t strictly need to match the name of the action. Advancing actions are generally about getting closer to your goal, while Defending actions are about keeping the opposition from getting theirs.
The details of what Concessions, Hits, Strikes, and Traits mean are described below.
| Progress | +2A |
|---|---|
| Reckless Effect | +3A and take a Hit |
| Block | +2D |
| Take One for the Team | +3D and owe a personal Concession (usable only once per conflict per player) |
| All-Out Effort | +3A -1D |
|---|---|
| Calculated Risk | +3A but take an extra Hit if you Draw |
| Win At All Costs | +4A and take an additional Strike that cannot be recovered |
| Targeted Effort | +2A and the enemy takes a Hit if you Draw |
| Total Defense | +3D -1A |
|---|---|
| Prepare | +2D -1A now and +1A next round |
| Observe | +1D +1A and scout one opposing roll next round |
| Recover | +1D and remove one Strike or regain a Trait |
The Opposition to the players doesn’t make so many choices: instead of each NPC getting an action, the opposition has an Advance and Defense to which they add their die rolls. The GM chooses one action for the opposition as a whole at the start of the round, but keeps it secret until the players have chosen their actions. They usually also have some Traits that might give them special abilities or restrictions.
The opposition can’t Observe but have an Obscure action as an option instead: +1A +1D and if the enemy uses Observe you cancel their scouting and add +1A or +1D next round (your choice, or both if the enemy Observed twice). If both teams have PCs, they both get access to both Observe and Obscure.
When the opposition uses Win At All Costs, instead of giving them a Strike, it removes a Strike from their opponents. They can only use it if there’s a Strike to be removed.
Once everybody has chosen an action:
After a round, either due to your action or due to a Push, one or both teams might take a Hit. When you take a Hit, your opponents can choose to either deactivate one of your traits for the duration of the conflict or to give you a Strike.
A Strike mitigates your success if you win. The players usually don’t have much incentive to put more than one Strike on their opponents, but the GM benefits from piling them on.
Concessions are negative outcomes for the players that they might owe if they win. It can’t negate their success, though.
In case it matters: Roll scouted rolls (from Observe), play actions, play bonuses, roll Advance and Defense, play post-roll bonuses, compare and resolve rolls, resolve action effects.
Opponents always play their bonuses before players do.
The conflict can generally end after any round at all. When it ends, the players may have achieved their goals or not. If they did, they might still owe a Concession.
Whether the players win or lose, if they have 2 or 3 Strikes, they each take a Minor Condition. If they have 4 or more Strikes, they each take a Major Condition.
If the players win, they get what they want but may owe a Concession based on the total number of Strikes that they have as a group. If they have 1 or 2 Strikes, they owe a Minor Concession. If they have 3 or 4 Strikes, they owe a Major Concession. If they have 5 or more Strikes, they owe two concessions: one Major, one Minor.
Concessions are narrative effects discussed by the group, although the GM makes the final decision (prioritizing fitting the level of the Concession and making sense to both them and the other players). A Minor Concession means you achieved your goal but not everything went your way. A Major Concession means either you achieved your goal but something that bodes very ill for the future happened or that you achieved most of your goal but its completion is still one step away.
When you would lose a team conflict, you may spend an Action Point to not lose. If you do so, your team takes a Hit, the Opponent removes one Strike or recovers one trait, and the conflict continues.
If the players lose, the Opposition gets what they wanted. If the Opposition has at least one Strike, the players get to choose one (with the GM interpreting the result):
If there are players on both sides, use the “if the players lose” list instead of Concessions, but both sides gain Conditions based on the number of Strikes as above.
At the start of any rounds (you can wait until after you see any rolls you scouted), you may concede. Conceding has to be a unanimous team decision. When a team concedes, they lose immediately but reduce their Strikes by two and likely take less severe conditions.
If the players’ team concedes, and they use one of their Complications to explain the loss, the player whose Complication it was gets an Action Point. You also get the more subtle benefit of determining how you lose.
Conceding doesn’t necessarily mean your characters concede or surrender, just that you lose.
Any player can choose at any time to withdraw their character from the conflict and choose no more actions. They still suffer any Concessions or losses from the results of the conflict, although the number of Conditions they get is determined by how many Strikes their team had when they withdrew.
It’s mostly not helpful mechanically, but it might make sense to withdraw for character reasons. Sometimes the GM might rule that withdrawing is impossible or will just kill you (e.g. if you’re trying to escape a burning building), when the situation suggests that.
Also, withdrawal is permanent. If you just want to not act a round or two, you can just do that instead of withdrawing.
When both comparisons are tied in a round, the conflict is over. Roll a d6 on this table to see how it ended:
| 6 | Love |
|---|---|
| 5 | An Astounding Discovery |
| 4 | A Third Power Enters the Fray (or Is Born) |
| 3 | A Natural Disaster |
| 2 | A Horrifying Act of Evil |
| 1 | Death |
Depending on the tone of the game, one or more of the outcomes can be swapped out for some of these (or something of the group’s own devising): A Foolish Mistake, A Miracle/Supernatural Event, A Selfless Act of Sacrifice, or a Betrayal.
Try your best to use the result you get, metaphorically if necessary.
Death doesn’t have to be a player character death, but sometimes that’s what makes the most sense. When you start your first Team Conflict, discuss whether Death can mean a player character’s death or not. Three good options are: “Death is never at stake in a team conflict”, “Death is always a possibility in a team conflict”, or “Death is only at stake when it’s announced at the beginning of the conflict”.
If a character wants to do something tangential to the conflict during it, then they can use their action to make a Skill Roll, resolved according to the basic rules. To keep this from being a big penalty to their team, they still get to provide either +1A or +1D, their choice.
TKTK p. 78
TKTK p. 84
The tactical combat rules get used when a fight breaks out and it is interesting, we have time, and the whole party is involved. Other fights tend to be resolved with a Skill Roll or three, or with a Team Conflict, either of which will resolve more quickly.
See also the Tactical Combat Glossary on pp. 95-97 of the book.
Here’s the quick summary of combat:
Combatants take turns. On your turn, you get to move, use a power to attack, and use a power from your Role, in any order. When you attack, you usually roll on the attack roll table to see if you hit and how well you hit. Depending on your roll, your attack might deal damage, have another effect, or both. Role powers usually just have their effect without having to roll. After your turn, the next character goes.
Each character has HP. When enemies are reduced to 0 they’re out; PCs are incapacitated at 0 but aren’t actually out of the fight for good until -5. When one side has nobody still in the fight, they’ve lost.
In procedural form:
At the start of the fight, decide what the players’ goal for the fight is. Generally, stick to the obvious. It’s fine if they’re simple, they just have to be more than “defeat these enemies”. Usually you have a single shared goal, though if you can’t agree, then maybe there are multiple in play. The goal should be something that is obviously achievable by defeating your enemies. Any player can object to an inappropriate goal.
If the players win the fight, they (almost always) get their goal. If they lose, the GM decides what happens and it probably won’t be what they wanted.
BTW, it’s best to be honest about your goal: your goal is at risk if you lose the fight, but anything other than your goals is at the whim of the GM, whose job is to challenge you. So, your goal is still at less risk!
Combat takes place on a square grid, with square sizes as appropriate to the particular setting/game. For context, a typical maximum range in combat is 10 squares, with some specialized characters getting double that. Fantasy games are typically like a yard or a meter to the square.
At the start of combat, everybody rolls a die to determine their Initiative. We take turns from highest to lowest. Monsters go before players in case of a tie. When multiple players are tied, they can choose between them who goes when.
Here’s what happens on your turn:
You can also spend your Attack Action on your turn to prepare an Attack or Move Action. Say a specific trigger and specifically what you’re going to do when that trigger happens. When it happens, you take the action you described. If the triggger doesn’t happen before your next turn, your preparation goes to waste.
At the start of your turn, you can choose to delay. When you delay, you take no actions, make no Saving Throws, lose any beneficial Statuses that end on your turn, but keep any Harmful Statuses that normally end on your turn. Then, after any creature’s turn ends, you may choose to take your turn. Your Initiative moves to the new spot for future rounds.
On your turn you get an Attack Action, a Move Action, a Role Action, and as many Free Actions as make sense. You can trade your Attack Action for a second Move Action, but cannot trade for a Role Action.
If another character grants you an attack, you can’t use it to use a power that grants another character an attack.
Crawling while Prone reduces your Speed to 2.
Certain actions grant an Opportunity to your opponents. When you provoke an opportunity, your opponent gets a chance to strike at you and deal damage. By default, characters deal 2 damage when they are granted an Opportunity. This happens as an Interrupt (and therefore before the triggering action is resolved).
A character can only take advantage of at most one Opportunity granted by each opponent in a turn. For example, if you move in a circle around a monster, they’ll only get to take one Opportunity against you.
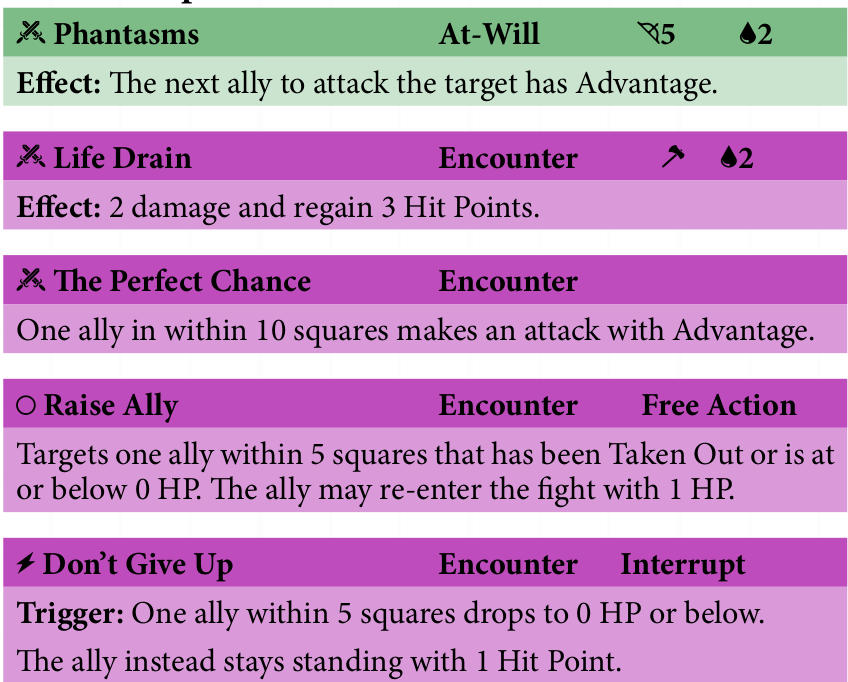
Powers in the book follow a standard format. Here’s some examples:
The icon in the top-left corner tells you what kind of Action they use.
 indicates an Attack Action. You get one of these per turn. Phantasms, Life Drain, and The Perfect Chance are all Attack Actions.
 indicates the power is triggered by something and does not use an action. Don’t Give Up is a triggered action.
 indicates a Free Action that can be used anytime on your turn. Raise Ally is a free action.
 indicates a Role Action. You get one of these per turn.
 indicates a Move Action. You get one of these per turn and can optionally trade your Attack Action for a second.
After the action type is the name of the power, and how often it may be used. That’s usually Encounter (you can use it once per combat) or At-Will (you can use it as often as you want and have the appropriate type of action for. These are color-coded: Green or Blue for At-Will, and Purple or Red for Encounter (Green/Purple for class powers, Blue/Red for role powers, generally), and Yellow for speicial powers that use different rules.
The top-right of the power might say “Interrupt”, “Free Action”, “No Action”, or the like. Or, it might have icons to indicate range and/or damage of attacks or role actions.
The range looks like:
The power may have a ![]() icon in the top line. This should have a number following it, which indicates how much damage the attack does on a hit, and the text below the top line should include “Effect:”, which tells you what additional effect the attack can have. If this icon is present it means you have to make an Attack Roll when you use it. If there’s no
icon in the top line. This should have a number following it, which indicates how much damage the attack does on a hit, and the text below the top line should include “Effect:”, which tells you what additional effect the attack can have. If this icon is present it means you have to make an Attack Roll when you use it. If there’s no ![]() , then you don’t have to roll, the power just always does whatever it says it does.
, then you don’t have to roll, the power just always does whatever it says it does.
And then below the top line, there’s a description of either the Effect of a power that requires an Attack Roll, or of what the power does.
Most Attack Powers (specifically, any that have a ![]() icon in their top line), require an Attack Roll on the table below hwhen you use them.
icon in their top line), require an Attack Roll on the table below hwhen you use them.
| 6 |
Critical Hit: Effect and 2 times |
|---|---|
| 4-5 |
Solid Hit: |
| 3 |
Glancing Hit: |
| 2 | Miss Gain a Miss Token |
| 1 | Miss Gain a Miss Token and a Strike |
![]() means you inflict the damage listed for the power, Effect means you apply the Effect listed for the power.
means you inflict the damage listed for the power, Effect means you apply the Effect listed for the power.
When you get a Strike, make a note of it. When the combat ends, the consequences for you personally and your team as a whole will depend on how many Strikes you have. You don’t want Strikes.
When you Miss, the GM gets to narrate a small Twist (some enemies or situations have special Miss Triggers to be used in this case, or the GM might make something up).
If you Miss every target with an attack, you get a Miss Token. You do want Miss Tokens. On future attack rolls this combat, you can spend them after the roll for +1 to the roll per token spent, as long as the roll was not a 1. If the roll was a 1, the first token you spend bumps the result up to a 3 (a Glancing Hit), but you still take a Strike. However, powers that trigger extra benefits on a Hit do not activate if you use a Miss Token to turn a Miss into a Hit. Unused Miss Tokens expire at the end of combat.
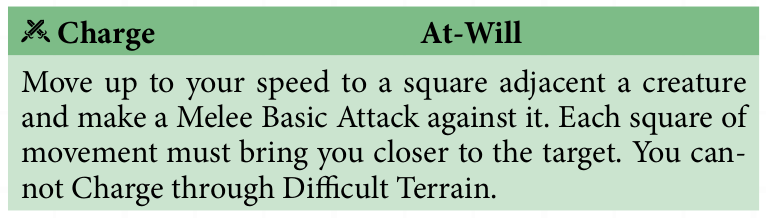
Every player character has a few standard abilities: melee and ranged basic attacks, charging into melee, Rally to regain some HP and a spent encounter power once per combat, and assessing enemies or the situation.
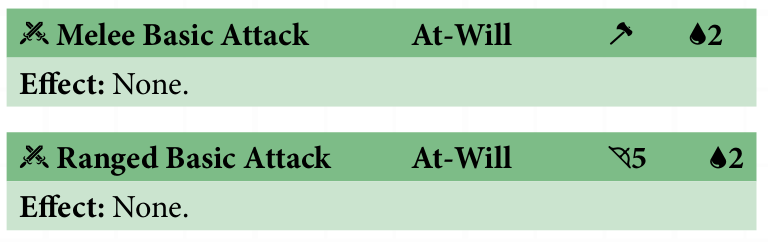
(Monsters also get basic attacks, and if their ranged attacks have a different range than 5, they get can use their ranged basic attack at the same range.)

You may only use Rally once per encounter.

Assess is a Role Action, and can be a good default way to use your Role Action on turns when you don’t want to use any of the ones from your Role.
If you want to improvise an attack that isn’t on your sheet, describe it and the GM will figure out an appropriate effect. Doing something cool and appropriate to the situation/enemy will generally get you 3 damage and a strong effect the first time. The point of this is to encourage you to try out new tricks and cool stuff, not to make up new powers that are stronger than the ones from your class, so repeated improvised actions will tend to be weaker (also doing the same thing over and over again isn’t as cool).
For other sorts of improvised/non-mechanically defined actions, the GM determines what sort of action it is and how to resolve it. If a Skill Roll is required in combat, roll it normally but instead of Costs you get Strikes. Twists in Combat tend to be smaller: even a simple failure or wasting your action can be enough of a Twist in a combat encounter where every moment counts.
Whenever anybody uses a power or creates a mechanical effect, they’ve gotta describe and explain what their character did. If the fictional description/situation conflicts with the mechanics, the fiction wins. If you can’t come up with an explanation that makes sense and fits the tone of the game for an effect, you can’t do it even if the mechanics say you can. This applies to the GM too.
But, it’s best to err on the side of permissiveness. If we realize the description doesn’t really work, then the player can revise their description. If they can’t think of a sensible explanation then somebody else can suggest one.
Characters start every combat with their max HP (10 for players, by default). They go down when you take damage and can be restored by means appropriate to the genre. They represent a combination of your physical capacity to fight on and your mental will to do so.
Whne you have HP equal to or less than half your max HP (rounded down), you are considered Bloodied. This doesn’t have intrinsic effect on its own but some powers will have additional or different effects on Bloodied targets.
When reduced to 0 HP or below, you are Incapacitated. If your HP is less than 0 and you regain HP in any way, your HP is set to 0 before adding the regained HP. While you’re Incapacited, you make a Comeback Roll at the start of your turn: roll a die, 1-2 you lose 2 HP (that cannot be resisted or reduced), 5-6 you regain 1 HP (going back up to 1 HP regardless of your current HP).
When you are reduced to a -5 HP, you are Taken Out. You’re out of this combat for good. Monsters usually get Taken Out immediately upon hitting 0 HP. You can also intentionally take yourself out of combat by escaping if you are 20 squares away from all enemies, or by other means such as surrender.
You get Strikes in these situations:
After each combat, consult this table to find out what Condition your character gets, based on how many Strikes you personally have accrued:
| 0-1 | No Condition |
|---|---|
| 2-3 | Winded |
| 4 | Exhausted |
| 5+ | Injured |
In some cases, you might get a different condition of similar severity instead.
You win a combat when all enemies are Taken Out and at least one person on your side is not Taken Out. Similarly, you lose when everybody on your side is Taken Out. Winning a combat doesn’t always mean you get exactly what you want, and losing a combat doesn’t (usually) mean the campaign or characters are over.
Here’s what happens when you win. First, count up all the Strikes your team has accumulated, then compare it to the number of players.
Concessions are narrative effects discussed by the group, although the GM makes the final decision (prioritizing fitting the level of the Concession and making sense to both them and the other players). A Minor Concession means you achieved your goal but not everything went your way. A Major Concession means either you achieved your goal but something that bodes very ill for the future happened or that you achieved most of your goal but its completion is still one step away. A Pyrrhic victory means you didn’t achieve your goal and it’s not even in reach anymore.
If you lost, the GM gets to put you in a bad spot. Maybe you’re captured, maybe you’re stripped of your possessions and left for dead. Maybe somebody even dies, if that’s the kind of stakes that are okay with the group. Rarely, maybe even the whole party dies.
If you and an ally flank a target (you’re both adjacent to the target and on opposite sides or opposite diagonals of the target), you both have Advantage on melee attacks against them.
Melee attacks against a prone target have Advantage.
Attacks (including Charge) while Hidden from your target have Advantage.
For conditions, Winded and Exhausted give Disadvantage to attack rolls in the first round of combat. Exhausted also gives Disadvantage to all other rolls as well. Major Conditions give -1 to all rolls.
Damaging zones only deal damage once per round per target.
Ranged or Melee attacks against a concealed target have Disadvantage.
Targets that cannot be seen cannot be targeted with Ranged or Melee attacks or Opportunities. They briefly reveal themselves when they attack, even if they remain Invisible.
When an area is obscured, creatures within it are concealed. If your only sight-lines to a target pass through an obscured area, that target is concealed to you. In particlar, all creatures are concealed to you if you’re in an obscured square. When an area is completely obscured, it’s just like obscured except that creatures cannot be seen instead of just being concealed.
When you’re Hidden, enemies do not know where you are. They can’t target you and you have advantage on attacks against them. If you take na action that reaveals your position, you remain Hidden until the end of your action, except for powers that let you attack multiple times (for those you only get advantage on the first attack).
To become Hidden, remain out of sight for a full round, in a place you could move around while remaining out of sight (you can’t hide behind a tree and just hope the enemy forgets you were there). After becoming Hidden, you don’t have to remain out of sight as long as you keep to cover or concealment. In some cases you might be able to make a Skill Roll to dart from one piece of cover to another without being seen.
Some monsters and player characters with certain feats have special senses that let them ignore some sources of concealed/cannot be seen.
TKTK p. 93